24 March 2011

I'm a Convert to Fresh Yeast


Having my airtight container of fresh yeast in the fridge was all too much for me yesterday and I decided to give it a go. I checked out my bread making book and lemon rolls struck me as a tasty treat and I had a lemon in the fridge, serendipidy! Making a full amount of dough was too much so I decided to make half the quantity (it did mean that I had to halve my already weighed parcel of yeast!).
So 250g of white flour, 5g fresh yeast, 5g salt and 175g water was all I needed for my dough and then the zest of a lemon that is added at the end of the kneading.
Using fresh yeast meant I had to rub the yeast into the flour, as if you were making a crumble mix, before adding the salt and water.
And almost immediatley as I started to knead the dough it felt different from the dried yeast dough. It was lighter, more pliable and it worked so easily. It felt....silken, yes that's the word for it, silken. Towards the end of the kneading I added the zest and worked it into the dough so it was evenly distributed, formed it into a ball and popped it into a floured bowl to prove for an hour. The dough rose better too. I then knocked it back and divided into four balls and formed them into rolls before leaving them to prove for another hour until they had doubled in size.
Then it was into the oven for 9 minutes until they were golden brown. They rose beautifully and the smell in the house was more bread-like than usual. All that was left to do was to butter and top them with smoked salmon and eat. They were so much lighter and airier than my previous breads, the texture was springy and holey, almost like "normal" bread! And so fresh yeast is the way forward.
Now that I'm making progress with the bread making I want to get some more of the bread making paraphenalia (proving basket, bread scraper, blade etc) and have found a great website where I can get it all called Bakery Bits. Roll on payday!

21 March 2011

The Search for Fresh Yeast


Now that my bread making year is well under way and I have mastered the basics I decided last week that I would move on to fresh yeast. And so the question begs, where do you purchase such a thing? As I work close to Whole Foods on High Street Ken I tried there first and it was a yes. However this was on Friday when it rained all day and a 20 minute walk through the park wasn't on. Next up was Waistrose in Westfield, a sure thing you would think? But alas no. I left it at that on Friday and chose my bread of the week resigning myself to the use of dried yeast again.
My bread this week was a Raisin, Hazelnut and Shallot loaf. Although it became Sultana, Hazelnut and Onion once I had looked in the cupboard!
This was a wholemeal bread, made with 300g wholemeal flour and 200g white flour combined with 10g yeast, 10g salt and 350g water. The onion, hazelnuts and sultanas are cooked first, cooled and then added to the dough at the end of the kneading. It was a bit messy as the hazelnuts and sultanas kept escaping but I managed to tame them! It then rested for 45 minutes. Then it had to be removed from its bowl and knocked back and returned to its bowl for another 45 minutes.
In the meantime we went shopping, as you do on a beautiful sunny Saturday morning. After filling up the trolley with the necessities (and some extras!) I thought I would ask at the bakery if they stocked fresh yeast. And low and behold they did, how much did I want? I got a bit flustered and asked for 200g (this cost the princely sum of 51p) and only realised after I had it in my sticky paws that I only use 10g each time I make bread!! But I had it, thanks to Sainsbury's in Denmark Hill.
Once we got home the dough was nicely risen. I shaped it into two loaves and left it to double in size (about an hour) before baking it for 20 minutes. While they were baking my brother rang and so I had to keep a close eye on them but he was very accommadating when I had to put him on hold while I removed them! (Said I would mention you, Alan!). We polished off a loaf for lunch (it was only wee) with some smoked salmon and creme fraiche, damned fine.
I was then left with my 200g of fresh yeast and what to do with it. After some searching today I discovered that it keeps well in the fridge for months or you can freeze it. This evening I have spent a good 20 minutes dividing it up into 10g pieces, wrapping them in clingfilm and putting them in an air-tight container! I decided to keep it in the fridge and we shall see. So next weeks bread will be made with fresh yeast, very excited (I don't get out much) and we shall see the difference it makes.

16 March 2011

Miniature Food, The Way Forward?


Looking back at my cooking and baking over the last few weeks I have noticed a trend, a trend toward mini food. It started off with my mini toad-in-the-holes a couple of weeks ago. I had made the real deal recently and then thought that mini ones would be fun. I made them in a muffin tray with a halved sausage in each one. And great they were, even had some for lunch later in the week.
I continued the trend with the mini Baked Alaska's, as seen earlier this week and I was on a roll. On Sunday, in my sickened state, I was restless and after flicking through Rachel's Bake I decided to make scones. Scones are easy, not many ingredients needed and they are scrummy straight from the oven.
I was going to make half the quantity (6) and went searching for my cookie cutter. But in the move I had ditched my large one and only had, you guessed it, a mini one! So, in a way I was forced into mini food this time.
I had one more stumbling block, no cream of tartar. After an extensive interwebulator search I discovered that there is no good substitute for cream of tartar! But in extremis you can just replace it with baking powder. I felt that the situation was extremis enough so that's what I did. I have now put it on my shopping list as they didn't rise a much as they usually do and no good kitchen is equipped without it.
I think the best thing about mini food is that you can eat more! They're only small, so three is ok, isn't it? They are also very cute, they really are And, of course, you can always pretend to be a giant!

14 March 2011

As Promised....


Mini Baked Alaska's! I said that I might try to make them and on Saturday night that was all I had the energy to do (I'm afraid dinner was yoghurt with cereal). I had the recipe from my previous attempt to make the normal size version, so I just did some downsizing.
Rather than using an ovenproof plate (as per instructions) I used a couple of ramekins, not traditional I know but... I broke up the chocolate sponge that I had left over and squeezed it into the base of the ramekins and then pored some Calvados over it (some extra flavour!) and left them for 15 minutes or so to soak in. As these were mini I used 1 egg white and about 45g of caster sugar to make the meringue (You don't need me to go into the details on that do you? You know all about the whisking of the egg white until you get stiff peaks and then the adding of the caster sugar in stages, whisking all the time? Yes? So no need then..).
Once the meringue was ready I put a spoon of ice cream on top of the sponge and then spread the meringue all over, making a nice swirly pattern on top.
Then it's just a matter of popping it in the pre-heated oven (200C) for about 4 minutes until the meringue is lightly browned. Oh and then there's the best part, the eating. I now need to make the normal size one, this just peaked my interest!

12 March 2011

Baking Night


I had a baking night week before last and was all set to write about it during the week when I was struck down with the lurgy (cold, cough etc) and only today started to feel a bit more human (thought I was on the mend yesterday but then went out this morning and had a relapse).
As you can see from my brief post earlier this week one of the baked goods I made was shortbread (guest blogged on My Kitchen Table) but I also made Cherry and Almond slices and a chocolate sponge for a Baked Alaska (more on the latter later).
The cherry slices are from the Mary Berry book I've been using in the last couple of weeks (the same one used for the shortbread) and they are baked in a tray and then sliced into squares.
Ingredients:
225g glace cherries
275g self-raising flour
2 tsp baking powder
225g butter, softened
225g caster sugar
zest 2 lemons
75g ground almonds
5 large eggs
25g flaked almonds
The most time-consuming part of this recipe is preparing the cherries. Not sure why but they need to be quartered, rinsed and then dried. Never heard this done with glace cherries before but if Mary says to do it then who am I to question? Once these are ready put all the ingredients (except the flaked almonds) into a bowl and beat together until they are mixed thoroughly then fold in the cherries. Pour into your prepared tin (12x9inch tray, greased and lined with greaseproof paper) and scatter the flaked almonds on top. Cook in a preheated oven (180 fan) for 40 minutes. Mine was ready after 35 minutes, all raised and brown and spongy to touch. Then leave it to cool in the tray before slicing into squares and storing for eating later. This makes a lot of slices and we are still eating them (a bit stale at this stage but they have lasted for over a week).
I then made the sponge for the Baked Alaska, but I still haven't made the Baked Alaska! It was for my visitors last weekend but after a dinner of mini toad in the holes (cute and yum) no-one had any room left so the sponge has been eaten on its own over the week (even BYO at Starbucks!). There is still some left so I'm thinking about making a couple of mini Alaska's tonight, I will let you know the outcome.
That was just three things baked in one evening but it took most of the evening, time consuming but well worth it. I remember my mother doing her baking on a Saturday afternoon when I was growing up and it took most of the day but we always ended up with apple tarts, fairy cakes and some other cake to keep us going during the week.

7 March 2011

Guest Blogging

Just a quick one to send you the link to the My Kitchen Table website where you will find my shortbread making experience! Fame at last!!

28 February 2011

Knitting Too


I'm in the midst of two knitting projects at the moment. One is a project just for the heck of it and the other is a commission.
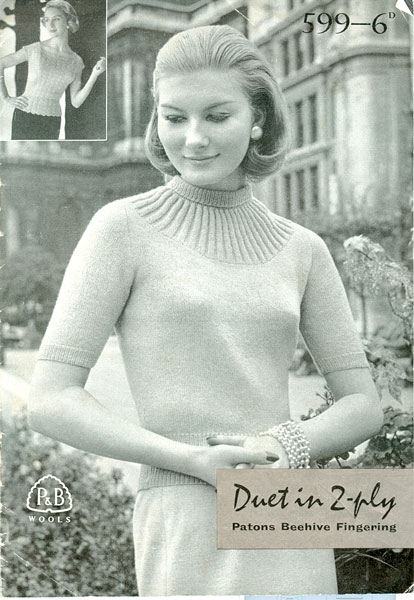
I started the first one earlier in the year. I've had the pattern for a while, bought at a vintage fair. It's a Paton's "Duet in 2-ply" number 599. I'm doing the one in the top left hand corner, the lacy cap sleeve number. I found the wool on ebay, it's an Italian brand called Adriafil Avantgarde in a lovely deep rose colour. A bargain as I only needed 3 50g balls at £2.75 each! It really is worth shopping around for your wool, there are loads of online wool shops out there with lots of different brands. I do love John Lewis on Oxford Street and, of course, Liberty but they do have a limited number of brands available (especially Liberty). The wool has a lovely feel to it too which is very important in a knitted top.
The pattern is a fairly basic lace pattern but it also has a ruched thing going on, not sure which bit of the pattern makes it ruch I just do what the nice pattern tells me.
But this is on hold at the moment as I have a commission from some friends for two cushions. Well, it started as a Christmas present of a cushion cover for their new house. But then we went to John Lewis and there were so many lovely wools there they couldn't decide so I'm doing two! In different colours. I've started the green one first, in fact it's a sage really. Lovely wool and easy to knit with, it's a Rowan Cocoon. I've just done a search for it so I can show you the lovely colour but when I put in the colour code I get either a terracotta or a grey!! I wouldn't describe the wool I'm knitting with by either of those colours, it's definitely green.
I found the pattern on Ravelry, a sort of facebook for the knitter. You have to join but it's worth it for the patterns. The cushion cover is a simple pattern, stocking stitch with colums of purl breaking it up and fastened with buttons on the front. It's knitted as one piece and then fitted around your cushion, simples (as a certain Meerkat would say, sorry, sorry, couldn't help myself!).
So progress pictures above, it's definitely green isn't it?