28 February 2011

Knitting Too


I'm in the midst of two knitting projects at the moment. One is a project just for the heck of it and the other is a commission.
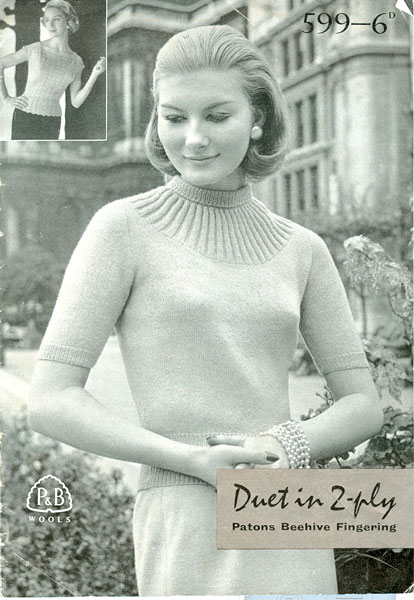
I started the first one earlier in the year. I've had the pattern for a while, bought at a vintage fair. It's a Paton's "Duet in 2-ply" number 599. I'm doing the one in the top left hand corner, the lacy cap sleeve number. I found the wool on ebay, it's an Italian brand called Adriafil Avantgarde in a lovely deep rose colour. A bargain as I only needed 3 50g balls at £2.75 each! It really is worth shopping around for your wool, there are loads of online wool shops out there with lots of different brands. I do love John Lewis on Oxford Street and, of course, Liberty but they do have a limited number of brands available (especially Liberty). The wool has a lovely feel to it too which is very important in a knitted top.
The pattern is a fairly basic lace pattern but it also has a ruched thing going on, not sure which bit of the pattern makes it ruch I just do what the nice pattern tells me.
But this is on hold at the moment as I have a commission from some friends for two cushions. Well, it started as a Christmas present of a cushion cover for their new house. But then we went to John Lewis and there were so many lovely wools there they couldn't decide so I'm doing two! In different colours. I've started the green one first, in fact it's a sage really. Lovely wool and easy to knit with, it's a Rowan Cocoon. I've just done a search for it so I can show you the lovely colour but when I put in the colour code I get either a terracotta or a grey!! I wouldn't describe the wool I'm knitting with by either of those colours, it's definitely green.
I found the pattern on Ravelry, a sort of facebook for the knitter. You have to join but it's worth it for the patterns. The cushion cover is a simple pattern, stocking stitch with colums of purl breaking it up and fastened with buttons on the front. It's knitted as one piece and then fitted around your cushion, simples (as a certain Meerkat would say, sorry, sorry, couldn't help myself!).
So progress pictures above, it's definitely green isn't it?

27 February 2011

Cheese and Cumin Bread


All settled in now and back on track with my bread challenge and today I decided on a flavoured bread, cheese and cumin bread. When I was out yesterday I picked up the cheese. I was supposed to be Gruyere but they only had sliced so I went for emmental which will do the job.
Apart from the white dough (made with 500g strong white flour, 10g yeast, 10g salt and 350mls water) rested for and hour you also need 250g cheese of choice and half a tsp each of cumin seeds and ground cumin. After kneading the dough (down to seven minutes today) and resting for the hour flatten the dough. Then sprinkle the cumin and cheese over it and press it in so that it is worked into the dough. Fold over a third of the dough then the other thirds and make into a ball and leave for another 30 minutes. The recipe was for three loaves but I decided to go for two slightly bigger loaves. After the 30 minutes is up you then divide in two and form into a loaf. I had the tins ready, greased and my lovely loaf liners popped in. Once you have formed them into loaves to pop them in the prepared tins and leave to double in size (about and hour, depending on how warm the kithcen is).
As I was making two loaves I decided to freeze one. I cooked that one for half the time, let it cool completely and then wrapped it in greaseproof paper and a plastic bag. This will be cooked through next weekend when we have visitors coming.
The other loaf was cooked for 20 minutes and eaten in about 10! Lovely warm cheesey bread with a of hint of cumin, works well with smoked salmon. And no oven problems today! The picture shows my effort in front of how it should look, I'll leave you to judge!

25 February 2011

What Happens When You Start Using a New Oven?

Well, I can tell you....cake disaster, that's what happens. As you know I have recently moved house and with the new house comes a new oven. Although, I have used this oven before and baked in it many times so it's not exactly new. So what went wrong on Wednesday night? I think it has something to do with the Fan Assistedness of the oven.
Up until now I have pretty much put the oven at the temperature that is required by the recipe, even though it is a fan assisted oven. I know that sounds mad. I should, of course, be reducing it by 20 degrees. But up until now I haven't had any problems. However, the honeymoon period is over, the oven is fighting back.
After my success with Mary Berry's Vanilla and Chocolate Marble cake a few weeks ago I received a free book from the publisher Mary Berry 100 Cakes and Bakes and have new cookbook will bake. I was visiting a friend the next day and promised cake and chose the apple and cinnamon cake which caught my eye as I flicked through.

Ingredients:
225g butter, softened
225g self raising flour
225g light muscavado sugar
3 large eggs
400g cooking apples, peeled, cored and grated
100g walnuts, chopped
100g sultanas
1tsp cinnamon
2tsp baking powder
extra sugar and walnuts for the top

It's very easy this one, pretty much just put all the ingredients except the apples and the cinnamon in a large bowl and beat until well combined. Then put half the mixture in your already prepared tin (greased and lined at the bottom), spread the grated apple and cinnamon on top and then spread the second half of the cake mixture over that and smooth. Sprinkle the extra sugar and walnuts on top and bake.
And here we come to the problem. Mary says a 180 oven or 160 for fan assisted for 1 and a quarter hours or 1 and a half hours. I decided to split the difference and put it at 170. After 50 minutes it had risen well and was starting to look cooked on top, I checked it by pressing the middle and it was still a bit squidgy (technical term) so I thought, give it another five minutes. Despite the fact that this was at least twenty minutes shorter than the time given. After the extra five minutes the top was starting to look a bit burned so I took it out and left it to cool in the tin. I had used a springform tin to I removed the spring bit and left it to cool a bit more before removing the bottom. It was the removal of the bottom that highlighted the problem, I took it off and the cake just collapsed in on itself and it was clear it wasn't cooked in the middle.
I managed to get it in a cake tin but it didn't get to my friend (thank you Maison Blanc for stepping into the breach), it wasn't for for purpose!
So, I think I now have to treat my oven as the fan assisted oven that it is and follow the instructions given by people with a lot more experience of these things than me. Having said that I've just had a piece and its mmmmmmmmm!

15 February 2011

Date and Oat Loaves


And I'm back with the bread making. Only just over a week since my last loaf. Truth be told I'm avoiding unpacking and what better way to do it that making a Date and Oat loaf (or two)?
I've been using the same bread book for all my bread making this year and it is Dough by Richard Bertinet. It's a great book, lots of great recipes and he explains all the techniques very well and very clearly. He doesn't use the traditional kneading with the heel of the hand. His is a more satisfying technique, one you can use to take out all your frustration on! It's a getting your fingers under the dough-lifting it up-smacking it down on the surface technique and today I kneaded the dough in about 10 minutes rather than the 15 of previous weeks. Richard Bertinet says that with this technique you can knead it in 5 minutes, so I'm going in the right direction.
Today I decided to try a brown dough loaf and opted for the Apricot and Oat loaf. Now as I didn't have any dried Apricots (I know, you are probably wondering about the state of my pantry!) but did have dates, voila, date and oat loaf. I figure any dried fruit is a good as another.
With this bread you do the kneading as above and once you get it to the right consistency you then add the dates and knead and fold until they are incorporated. Then it's rested for the usual hour until doubled in size. You then divide it into two balls and leave for 10 minutes and then shape these into loaves. Brush with some water and then role the loaves on the oats and leave to prove for another hour. Then bake for 25 minutes.
Just eaten three slices of this with mackerel and pickle, great. Crusty on the outside and gooey and sweet on the inside. And there's a whole other loaf left.

Toad and Moet!


As mentioned in my last post, I moved house this weekend. I know that people say that moving is up there with some of the most stressful things you will do in your life but it's not until you have to do it that you realise how true that is. Especially when it is ten years since I last moved! You forget the pain. But it all went fairly smoothly and I am now ensconced in my new home.
(I know that this blog is about cakes but if I take a leaf out of Lorraine Pascal's book (and I think I can) then baking is anything that you bake in the oven, so read on)
On our fist evening together my other half made noises about fancying Toad in the Hole for dinner. Now I'm sure you are thinking that he should be cooking for me on our first night but believe me it's better this way! I had been out to lunch last week and have the self same toad and was thinking that I should try to make it. Serendipity.
One of the cookbooks I have inherited in my new house is a book called Sausage and Mash and as you will gather from the title it is a whole book on sausage and mash, who knew? And in amongst the various sausages and mashes there is a recipe for a traditional Toad in the Hole.
Ingredients are just flour (110g), half tsp salt, 2 eggs, 175ml semi-skimmed milk mixed with 125mls water (I used skimmed instead), 8 pork sausages and oil. We only had beef sausages so I'm hoping the Toad purists will forgive me.
You make the batter by mixing the flour, salt, eggs and milk (whisking is easiest) and put it in the fridge to rest for 30 mins. Then heat the oven to 225 and put your toad pan in with 3tbsp of oil (the recipe calls for rapeseed but I used groundnut, needs must) and heat it until it is smoking which takes about 10 minutes. Meanwhile you brown the sausages. Once the oil is ready pour the batter in (it should start sizzling immediately) and then drop the sausages in. It says to bake for 35-40 minutes but mine was ready after 25. It had risen around the edges but not in the middle, not sure if my sausage placement was correct. But once we were eating it with the onion gravy and Moet I didn't really care.

5 February 2011

Roll Loaf


Week two in the 2011 bread making challenge and another loaf successfully made (and eaten!). I decided to use the basic white dough this morning and make a connected roll loaf. Does that make any sense? I'm having difficulty describing it.
I used a round tin, divided the dough into 12 small rolls and arranged the rolls in the round tin so that when they were cooked they were connected but easily torn into their original roll form. When I post the picture hopefully you'll know what I'm talking about.
Today I felt that I had nailed the kneading, I could really feel the dough coming together and becoming all smooth and bouncy. I think it took me about 15 minutes of kneading. I also added some extra water to the dough and I think that helped too.
I took a leaf out of Lorraine Pascale's book (or rather her TV show) and put the dough to prove in front of the warm oven and it worked. The dough doubled in size and when I knocked it back and folded it into the rolls it felt lovely and soft.
I baked it for about 18 minutes, it rose well and when I broke it up it wasn't as dense as my previous attempts, lots of nice holes and air. It went down very well with some butter and homemade blackcurrant jam. It doesn't last very long this home made bread does it?
Next week I am moving house so I don't think there will be bread making time but fear not I will be back after that to continue the 2011 BC (bread challenge of course, keep up).

4 February 2011

Vanilla and Chocolate Marble Cake


To all intents and purpose this is a Chocolate Swirl Cake (see Chocolate Squirrel Cake post of last year). Sounds a bit posher maybe but a Chocolate Swirl cake it is.
My friend sent me a link to a new website last week, My Kitchen Table, that has some great chefs on there showcasing new recipes. Having had a little surf and feeling very baking deprived after my January of non-baking I decided to make a cake and chose Mary Berry's above mentioned Marble Cake.
As you will see from the recipe it is an all in one cake, all the ingredients go in together and you mix with an electric whisk until all combined. Then it's a matter of halving the mixture and adding you chocolate (in the guise of cocoa powder) to one half. Then you have the fun of putting them into the loaf tin in a higgledy piggledy sort of way (technical term) and that way you get your marbling.
I followed the oven instructions and took off the 20 degrees for a fan oven but after 40 minutes it was still rather soggy so for the last ten minutes I put it up to 160 and it was perfect. Nicely risen and springy to the touch.
The icing was my favourite bit, a whole new way of making icing. You melt the butter and then add the cocoa powder (over the heat) and stir until smooth. Add the icing sugar with a couple of tablespoons of milk and stir until it's all incorporated then take off the heat and mix until smooth. You get a beautiful glossy icing and it hardened very quickly. I then added it to the loaf and voila. I didn't have any white chocolate so the final flourish didn't happen but I think that's ok.
I brought the cake into work last Monday and we had it in the afternoon as everyone was flagging. It got good reviews and lots of nostalgic comments about their mothers making it when they were growing up. I love that about cakes, they never go out of fashion.

1 February 2011

New Year New Colour

Yes, I've been at it again, I've changed the look of the blog. I can't settle on one look for long, can I? Oh well. I felt the previous all white look was a bit stark and shouty so I've gone for a more muted colour palette this time and I like the new layout too. I will try not to play around again (although you've heard that before!)
Also a picture of the finished Focaccia below, it was damned fine.